Monday, September 13, 2010

Sessions per Instance using GV$SESSION

I've been doing some testing around Oracle 11.2 RAC and decided to share a few findings so I'll be trying to document them in my blog, which I've been too busy to update. I have to give my sincerest thanks and appreciation to all the bloggers who regularly update, I've no idea how they find the time but appreciate their efforts as I've found gems of information which have really helped me.

One of the first things I've seen with 11.2 RAC is that the information, blogs included, is a bit wanting... there simply are not a lot of good, useful or factual information, even the Oracle documentation is light or inaccurate. Yes, I have given feedback to the inaccuracies and they should be corrected so hopefully you wont even notice or see any evidence. This contrasts with 11.1 and previous version which have lots of blogs, and good, useful information. To me this indicates adoption is still a work in progress for this version, which makes sense since it does bring a lot to the table which needs to be thoroughly tested.

A little trinket of, hopefully, useful information which I found on the OTN forums (credit to Sebastian), which I had not previously realized, but was puzzled during my 11.2 RAC testing:

Say you have a query to get the number of sessions of a particular user across all the nodes (for example to see how load balancing is working):

SELECT inst_id ,username ,count(*) FROM GV$SESSION
FROM username = 'ABC' GROUP BY inst_id ,username


This results in "strange" behavior if you query the GV$SESSION table as the same user ABC, as 2 parallel servers are spawned to query the V$SESSION table on each node. This happens as the same user, i.e. ABC. Hence you will see 3 (1 real and 2 parallel) slaves querying the V$SESSION on each instance. The reason you will see 1 on one node and 3 on the other is the order in which the parallel processes query the V$SESSION.

If you use another user to query the sessions for ABC you will not see this problem and get an accurate session per instance count.

Hope that explains it.

Thursday, July 08, 2010

Oracle Cluster Health Monitor (formerly IPD/OS)

Oracle Cluster Health Monitor (formerly known as Instantaneous Problem Detector for Clusters or IPD/OS) is designed to detect and analyze operating system (OS) and cluster resource related degradation and failures in order to bring more explanatory power to many issues that occur in clusters where Oracle Clusterware and Oracle RAC are running, such as node eviction.

It tracks the OS resource consumption at each node, process, and device level continuously. It collects and analyzes the cluster-wide data. In real time mode, when thresholds are hit, an alert is shown (i.e. you need to be looking at the screen in GUI mode). For root cause analysis, historical data can be replayed to understand what was happening at the time of failure.

I had a bit of trouble during the initial installation since it was not made clear in the README that you MUST unzip and run the subsequent installation process from the home directory of the user doing the installation. I forgot this during re-installation as well, which led to me spend quite a lot of time re-learning this important fact, and hence documenting this for reference.

Oracle Enterprise Manager (OEM) Grid Control, and other tools, provide similar functionality, but I've found that Cluster Health Monitor (CHM) is better in terms of real-time analysis, monitoring and its playback functionality. It is also free, as in no charge, and very easy to setup and maintain.

My environment:

  • 4-node Oracle 11.2.0.1 RAC
  • Hostnames: ucstst11, ucstst12, ucstst13, ucstst14
  • OS: Oracle Enterprise Linux 5u4 x64

Installation Steps
1. Create 'crfuser' on all nodes in cluster - This can be any user except root, I do recommend however using a separate user from the regular 'oracle' for separation of duty. Perhaps a standard user used for monitoring tools. The user's group does not have to be oinstall, I just use it here to show that this user also owns 'Oracle' software, and will be an administrator.

#> useradd -d /opt/crfuser -m -s /bin/ksh -g oinstall crfuser


2. Setup password-less SSH user equivalence among all the users across the nodes - I wont go into this here since there are numerous sites as to how to set this up (including one of my own I believe).

Note: If you do have a previous installation of CHM installed you will need to uninstall before proceeding with the new installation. To install, on each node where there is a previous installation:

a. Disable CHM

#> /etc/init.d/init.crfd disable

b. Uninstall CHM

#> /usr/lib/oracrf/install/crfinst.pl -d

c. Remove the Berkely database or BDB (wherever it was installed), and the previus CHM installation home if it still exists.


3. Login as the CHM user ('crfuser') and unzip the install file, it can be obtained from Oracle Technology Network (OTN) here.

#> su - crfuser
#> unzip crfpack-linux.zip

Ensure you are in the 'crfuser' home directory when running the unzip command, or that the unzip is done to that directory.


4. Run the installer to setup the nodes - This step does not actually do any installation so if anything fails simply remove the files, fix the error, and try again. What this step does is to:

a. Run some checks for SSH access to all nodes
b. Assign a replica node
c. Generate a cluster-wide configuration file
d. Send the installation files across the other nodes.

To start the process, from any node:

$> cd ~/install
$> ./crfinst.pl -i ucstst11,ucstst12,ucstst13,ucstst14 -b /opt/oracrfdb -m ucstst11 -N RACDB

Replace the node list with those of your own, you will also need to designate one as a master node, i.e. '-m ucstst11'. If you leave out this argument you will be prompted to designate a master node. By default the cluster will be called 'MyCluster', I've used '-N RACDB' to name my cluster something more known to me, i.e. 'RACDB'. I've also specified (using '-b /opt/oracrfdb') that the location for the BDB database which stores all the captured data should be '/opt/oracrfdb'. This must be a separate file system or mount point, i.e. not under '/' directly otherwise the installation will complain and exit. I'm unsure as to where the default would be located or if there is one since I never tested this setup, but of course you can also work around using somewhere under '/' (if you are short on mounts or space) by modifying the appropriate line in the 'crfinst.pl' Perl script, or using a loopback filesytem.


5. Following this, you will then need to run on each node as the root user:

#> /opt/crfuser/install/crfinst.pl -f -b /opt/oracrfdb -N RACDB
#> /etc/init.d/init.crfd enable

Note: The above step will remove the files which were unzipped previously in the 'crfuser' home directory from the 'crfpack-linux.zip' file. So don't be surprised when this happens.


6. Install the GUI - It is not recommended to install the GUI on any of the RAC nodes due to performance (the GUI takes a few resources) and availability issues (the node running the GUI goes down), but in a simple setup this is okay. Ideally you would install only the GUI portion on any remote client machine. To install only the GUI:

a. Unzip the 'crfpack-linux.zip' file again, to the home directory of the 'crfuser' (or whatever user this time around).

$> cd /opt/crfuser
$> unzip crfpack-linux.zip

b. Run the GUI installation

$> mkdir oracrfgui
$> cd install
$> ./crfinst.pl -g /opt/crfuser/oracrfgui


7. Run the GUI. The below command starts the GUI by connecting to the master node, with a one second refresh time.

$> cd ~/oracrf/bin
$> ./crfgui -m ucstst11


Some Usage Tips
Refresh Rate
To modify the GUI refresh rate (default is 1 second) specify the '-r ' option. The below uses a 5 second refresh rate to update the GUI:

$> ./crfgui -r 5 -m ucstst11


Historical Mode
To do historical analysis specify the '-d ::' option which will display data from the database from the current time until the number of hours, minutes, and seconds specified in the past.


Creating a Loopback Filesystem for the BDB location

1. Create the local file on each node which must be at least 5GB per node, i.e. 5000 * N, or in my case 20000 (5000 * 4).

#> dd if=/dev/zero of=/mnt/oracrfdb.fs count=20000 bs=1M

2. Create a file system on the file, using a label of "ipdosbdb' or whatever is your choice:

#> mke2fs -F -j -L "ipdosbdb" /mnt/oracrfdb.fs

3. Edit the '/etc/fstab' file to ensure the filesystem will be re-mounted following a reboot by adding the following line:

/mnt/oracrfdb.fs /opt/oracrfdb ext3 rw,/dev/loop0 0 0

Specify an available loopback device substituting '/dev/loop0' as appropriate.

4. Mount the file system:

#> mount /opt/oracrfdb


Hope this helps. Feedback and comments welcome!

Thursday, November 19, 2009

How to install Windows 7 from a USB Flash Drive

Requirement
  • 4GB USB Drive (minimum)
  • Windows 7 ISO (32-bit or 64-bit)
  • Windows Vista
  • MBRwiz (Windows XP diskpart utility does not detect USB pen drives so this free utility will make the USB drive bootable)
  • MagicDisc (freeware utility to mount ISO as virtual drive)

Note:
My running OS during this setup (which worked) was Vista (32-bit for the 32-bit Win7). When I tried using XP, the process resulted in a bad boot sector so I could not use the USB Flash drive to load Windows 7. I've seen other blogs where the likely suspect is the 'bootsec.exe' command does not work properly when on XP (I've no idea why). Also, in Vista, you actually don't need the separate 'MBRwiz' program, as 'diskpart' will work just fine. The steps to use that process can be easily googled, or you can leave me a comment and I'll add those in this blog.

Steps
1. Connect your USB flash drive to your computer for formatting, and make note of the drive letter assigned. For the purposes of this tutotial we will use E:.

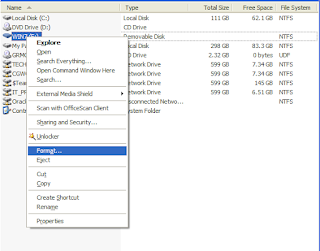
2. In Windows Explorer or other file management utility, right click on the USB drive and select 'Format…' from the context menu.


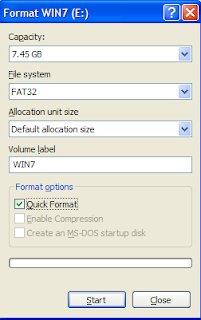
3. Click the 'Start' button to begin formatting your USB drive. This ensure there is nothing on the drive (starting from scratch if you will).


4. Open a command prompt window ('Start' menu -> 'Run…' -> cmd -> press 'ENTER') and type:

convert E: /fs:ntfs (remember E: is my drive letter so substitute with yours as appropriate).


5. Extract your download of MBRwiz (if not already done) to a location of your choice, and open a command window in the same location. Run the commands:

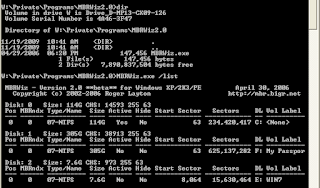
MBRWiz.exe /list (this gets a listing of all disks, so note down the disk number assigned to your USB drive which will be used in the next command)


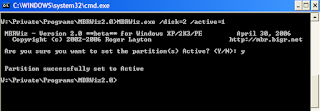
MBRWiz.exe /disk=2 /active=1 (my disk was detected as '2', so replace this with whatever yours was detected as)


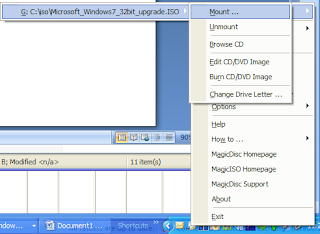
6. Install the MagicDisc software (if not already done) and mount your Windows 7 ISO as a virtual drive (mine was mounted as G:). You can of course use any other type of such software such as CD Anywhere, it does not matter. Alternatively, if you have a Windows 7 disk, or the full installation files otherwise you can use this, you do not need the ISO (I just happened to download it as such).


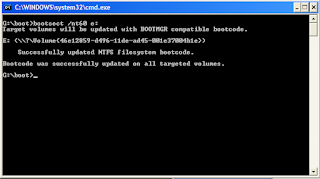
7. Open a command prompt window to the virtual drive, navigate below the 'boot' subdirectory and run the command:

bootsect /nt60 E: (E: was my drive letter substitute with yours as appropriate).


Note: This command will only work if the architectures match, i.e. I was using 32-bit Windows XP, and had a 32-bit Windows 7 media (and hence 'bootsect' file). When I tried using the same 'bootsect' command from the Windows 7 64-bit media it failed. I've not tested it yet, but it is likely that you can just run the 32-bit version of the 'bootsect /nt60 E:' command, and then continue with the steps for copying the 64-bit Winows 7 media to the USB drive and it should still allow installation from the USB (after all this command is only saying make the USB bootable to Windows 7, right?).

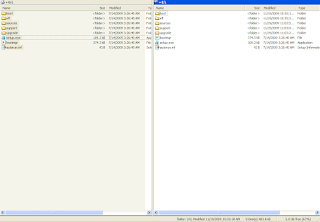
8. Copy all the files from your Windows 7 media (in my case ISO mounted virtual drive G:) to your USB drive. You should be able to use any file manager such as Windows Explorer (in my case I used Xplorer2 Lite which has dual pane views).


9. Before using your new USB drive with Windows 7 to boot and install Windows 7, ensure your BIOS is setup to boot from a USB drive. This is configured when rebooting by entering your BIOS, or just pressing F9 for a boot option screen in some cases. If all goes well Windows 7 installation should start from your USB drive.

Friday, November 13, 2009

How to use files for ASM disks

One of the issues I've seen is that many people do not have an environment in which they can learn ASM, i.e. they don't have numerous disk to support an ASM setup. For example, if you have a single disk which already has a file system and would like to play around or learn ASM, how do you accomplish this? Turns out this is quite simple in UNIX/Linux using the 'dd' command to create a set of files, which are then associated with loop devices using 'losetup', and associated with raw devices using the 'raw' command.

The steps below are in no way unique so I can not take credit, I also do know the actual originator. I came across the method maybe in 2007 when I was seeking just such a method, and have recently found an article I thought I'd publish in my own words with a bit more detail. I have heard there is a similar method for Windows (makes sense), but as that is not my preferred platform I did not seek to either verify or test out that method.

Note that this setup should not be used in a production environment. It is strictly for testing or training purposes.

1. Create a directory under your file system(s) to store the ASM files.

$> mkdir /u02/asm
$> cd /u02/asm

2. Create files full of zeros using 'dd' command. I've used a block size of 32KB (bs=32K) to improve the build performance, and a count of 983040 to get files of 32GB. The files are named 'asmdiskX' (of=asmdisk1) where X is 1 to 4. I ran the four commands in parallel in the background, which took a really long time (almost 3 hours). No doubt this was due to the fact I was using a shared USB attached 500GB drive (with other things happening) so the operations could have probably gone quicker in serial, with less happening on the drive.

$> dd if=/dev/zero of=asmdisk1 bs=32K count=983040 &
$> dd if=/dev/zero of=asmdisk2 bs=32K count=983040 &
$> dd if=/dev/zero of=asmdisk3 bs=32K count=983040 &
$> dd if=/dev/zero of=asmdisk4 bs=32K count=983040 &

Note that I have run the commands as 'oracle', so I did not need to change ownership. If you have run as root then run the command below on the files to change their ownership to 'oracle':

$> chown oracle:dba /u02/asm/asmdisk*

3. Use 'losetup' to associate loop devices with the regular files (or block devices).

$> losetup /dev/loop1 /u02/asm/asmdisk1
$> losetup /dev/loop2 /u02/asm/asmdisk2
$> losetup /dev/loop3 /u02/asm/asmdisk3
$> losetup /dev/loop4 /u02/asm/asmdisk4

I believe there is a limit on the number of loop devices so you should check before running the commands if you have them available. On my system it was all clear, I've not tested but I believe the command below would create loop devices:

# create a new loop device
$> mknod /dev/loop/300 b 7 300

4. Use the raw command to associate the character block device with a raw device.

$> raw /dev/raw/raw1 /dev/loop1
/dev/raw/raw1: bound to major 7, minor 1

$> raw /dev/raw/raw2 /dev/loop2
/dev/raw/raw2: bound to major 7, minor 2

$> raw /dev/raw/raw3 /dev/loop3
/dev/raw/raw3: bound to major 7, minor 3

$> raw /dev/raw/raw4 /dev/loop4
/dev/raw/raw4: bound to major 7, minor 4

5. Change the ownership of the raw devices to 'oracle' and group to 'dba'.

$> chown oracle.dba /dev/raw/raw[1-4]

6. Setup a startup file to enable the setup to survive a reboot. Place commands from steps 3 to 5 into a script (/etc/init.d/asmsetup) which will run during system startup. An example script and steps are setup is below:

#!/bin/bash
#
# chkconfig: 2345 15 99
# description: Setup files to be used as ASM disks.

# Source function library.
. /etc/init.d/functions

disklocation=/u02/asm

prog=$"ASM file disk setup"

start()
{
echo -n $"Starting $prog: "
/sbin/losetup /dev/loop1 ${disklocation}/asmdisk1
/sbin/losetup /dev/loop2 ${disklocation}/asmdisk2
/sbin/losetup /dev/loop3 ${disklocation}/asmdisk3
/sbin/losetup /dev/loop4 ${disklocation}/asmdisk4
/bin/raw /dev/raw/raw1 /dev/loop1
/bin/raw /dev/raw/raw2 /dev/loop2
/bin/raw /dev/raw/raw3 /dev/loop3
/bin/raw /dev/raw/raw4 /dev/loop4
/bin/chown oracle.dba /dev/raw/raw[1-4]
}

# See how we were called.
case "$1" in
start)
start
;;
*)
echo $"Usage: $0 {start}"
exit 1
esac

$> chkconfig --add asmsetup

This creates the following files:

/etc/rc2.d/S15asmsetup
/etc/rc3.d/S15asmsetup
/etc/rc4.d/S15asmsetup
/etc/rc5.d/S15asmsetup

/etc/rc0.d/K99asmsetup
/etc/rc1.d/K99asmsetup
/etc/rc6.d/K99asmsetup

chkconfig refers the " # chkconfig: 2345 15 99" from asmsetup. This signifies that the service has start run level set to 2, 3, 4 and 5. Stop run level set to 0, 1 and 6 (the stop does nothing in this case). And the start priority should be 15 and stop priority be 99.

ASM now has disks which can be used. I'll write a follow-up on using these disks for an ASM installation. I'll be doing both version 11.1 and 11.2 for ASM but not sure which I'll write about yet (maybe both, maybe one). 11.2 is definately more interesting since I've done 11.1 already so that has the edge right now.
Monday, December 29, 2008

How to Change the DBID and/or DB_NAME of an Oracle Database

How to change the DBID (and DB_NAME)


Step 1. The database should be backed up.


Step 2. Ensure to perform clean shut down of a database and startup in mount stage (but not open).


SQL> SHUDOWN IMMEDIATE;

SQL> STARTUP MOUNT;


Step 3. Invoke the DBNEWID utility (nid) specifying the new DBNAME (if also changing the DB_NAME) from the command line using a user with SYSDBA privilege:


Note: To change the database ID without changing the database name, in Step 3 do not specify the optional database name (DBNAME).


$ nid TARGET=SYS/XXXX@test DBNAME=test_db


DBNEWID performs validations in the headers of the control files (not the data files) before attempting I/O to the files. If validation is successful, then DBNEWID prompts for confirmation, changes the database name in the control files, shuts down the database and exits.


DBNEWID: Release 10.2.0.1.0 - Production on Mon Mar 26 20:04:26 2007


Copyright (c) 1982, 2005, Oracle. All rights reserved.


.
.
Connected to database PROD (DBID=86997811)  
Connected to server version 10.1.0  
Control Files in database:  
/oracle/TEST_DB/data/cf1.f  
/oracle/TEST_DB/data/cf2.f  
The following datafiles are offline clean:  
/oracle/TEST_DB/data/tbs_61.f (23)  
/oracle/TEST_DB/data/tbs_62.f (24)  
/oracle/TEST_DB/data/temp3.f (3) 
These files must be writable by this utility.  
The following datafiles are read-only:  
/oracle/TEST_DB/data/tbs_51.f (15)  
/oracle/TEST_DB/data/tbs_52.f (16)  
/oracle/TEST_DB/data/tbs_53.f (22) 
These files must be writable by this utility.  
Changing database ID from 86997811 to 1250654267 
Changing database name from PROD to TEST_DB  
Control File /oracle/TEST_DB/data/cf1.f - modified  
Control File /oracle/TEST_DB/data/cf2.f - modified  
Datafile /oracle/TEST_DB/data/tbs_01.f - dbid changed, wrote new name  
Datafile /oracle/TEST_DB/data/tbs_ax1.f - dbid changed, wrote new name  
Datafile /oracle/TEST_DB/data/tbs_02.f - dbid changed, wrote new name  
Datafile /oracle/TEST_DB/data/tbs_11.f - dbid changed, wrote new name  
Datafile /oracle/TEST_DB/data/tbs_12.f - dbid changed, wrote new name  
Datafile /oracle/TEST_DB/data/temp1.f - dbid changed, wrote new name  
Control File /oracle/TEST_DB/data/cf1.f - dbid changed, wrote new name  
Control File /oracle/TEST_DB/data/cf2.f - dbid changed, wrote new name  
Instance shut down  Database name changed to TEST_DB. 
Modify parameter file and generate a new password file before restarting. 
Database ID for database TEST_DB changed to 1250654267. 
All previous backups and archived redo logs for this database are unusable. 
Database has been shutdown, open database with RESETLOGS option. 
Successfully changed database name and ID. 
DBNEWID - Completed successfully. 

Note: If validation is not successful, then DBNEWID terminates and leaves the target database intact, as shown in the following sample output. You can open the database, fix the error, and then either resume the DBNEWID operation or continue using the database without changing its DBID.


Step 4. Change DB_NAME initialization parameter in the initialization parameter file (PFILE) to the new database name.


SQL> STARTUP MOUNT;

SQL> ALTER SYSTEM SET DB_NAME=test_db SCOPE=spfile;

SQL> SHUTDOWN IMMEDIATE;


Step 5. Create a new password file


On Unix:

$ orapwd file=/oracle/product/10.2.0/db_1/dbs/pwdtest_db.ora password=xxxxxxx entries=10


Step 6. Open the database in RESETLOGS mode and resume normal use. For example:


SQL> STARTUP MOUNT;


SQL> ALTER DATABASE OPEN RESETLOGS;


Note: To change only the DBNAME, use the SETNAME parameter in Step 3 which tells the DBNEWID utility to only alter the database name and not the database ID, it is then not necessary to use the RESETLOGS option when opening the database.


Step 7. Backup the whole database again.


Thursday, October 23, 2008

How to Create Non-Sparse TEMP files

Temp Files


Temporary data files in Oracle are a special type of data file. Oracle will use temporary files to store the intermdiate results of a large sort operation, and hash operations, as well as to store global temporary table data, or result data when there is insufficient memory to hold it all in RAM. Temp files also never have redo generated for them, though they can generate undo. Temporary data files never need to have backups done and doing so is a waste of time since upon recovery they need to be recreated.

Once of the nuances with temp files is that if the OS permits, the temporary files will be created sparse, i.e. they will not actually consume disk storage until they need to. This is mostly the case from my experience on UNIX/Linux systems and can be seen by comparing the output of df anddu or ls for the file system on which the temp files were created.

This results in temp files being created almost instantneously since no storage is allocated, however, since you can create files larger than the space you actually have available, you will quickly run into errors such as 'no more space' when that space is then being requested.

Creating non-sparse TEMP files

There are a few ways to create non-sparse files, I'm just showing the way I've used and know work.

1. Create the OS file:
$> dd if=/dev/zero of=/u02/oradata/ORCL/temp1_01.dbf bs=1024k count=1024

2. Create the TEMP tablespace and/or temp file:
SQL> CREATE TEMPORARY TABLESPACE temp1 
TEMPFILE '/u02/oradata/ORCL/temp1_01.dbf' REUSE;

Using Oracle SPFILEs

Using Server Parameter Files (SPFILEs)


SPFILEs remove the proliferation of parameter files, as well as the ability to maintain such files outside the database using text editors. The default naming convention is

spfile$ORACLE_SID.ora - UNIX/Linux environment
spfile%ORACLE_SID%.ora - Windows environment

I recommended to maintain the default location, i.e. $ORACLE_HOME/dbs, as doing otherwise defeats the simplicity SPFILEs represent. Also, moving the file elsewhere involves you telling Oracle this new location and otherwise keeping your own internal audit of that location, leading to the similar problems caused by using parameter files.


SPFILEs and Oracle RAC

When using Oracle RAC, all instances share the same SPFILE. This single SPFILE contains all the parameters for all instances with instance-specific settings identified by the SID.

*.cluster_database_instance=2
*.db_name='ORCL'
ORCL1.undo_tablespace='UNDO_ORCL1'
ORCL2.undo_tablespace='UNDO_ORCL2'

In the above example, the *.db_name='ORCL' indicates all instances using this SPFILE will be mounting a database named 'ORCL'. The ORCL1.undo_tablespace='UNDO_ORCL1' indicates the instance named ORCL1 will use that specific undo tablespace and so on.


Setting & Unsettting Values in SPFILEs

The command below shows the format of the command used to manipulate settings using an SPFILE.

ALTER SYSTEM SET parameter=value ;

Portions in <> are optional, and the presence of the pipe symbol indicates "one of the list".

The various sections are pretty straight forward so I will no go into most of them here.

  • The DEFERRED option which specifies the system change is to take place for subsequent sessions only (not currently established sessions). This is important since by default changes will take effect immediately, but some parameters cannot be changed 'immediately' - they can only be changed for newly established sessions. The error received for such commands is 'ORA-02096: specified initialization parameter is not modifiable with this option'.

  • The SID='sid|*' is mostly useful in a clustered environment; SID='*' is the default. This allows you to specify a parameter setting uniquely for any given instance in the cluster. However, if you need to 'unset' a parameter such that it does not show in the SPFILE and is therefore defaulted, you will need to make use of SID='sid|*' component. For example, to 'unset' the SORT_AREA_SIZE parameter:

ALTER SYSTEM RESET sort_area_size SCOPE=spfile SID='*';

The general format to 'unset' parameters is

ALTER SYSTEM RESET parameter SID='sid|*';


SPFILEs Copies

You can create backup copies of your SPFILE as either a one-time parameter file
CREATE pfile FROM spfile;

Using an OS copy command, or if on a UNIX/Linux platform you can extract your settings using:

strings spfile$ORACLE_SID.ora

On Windows you can just open in WordPad and copy and paste the text which will be formatted as clear text into another file. You can also obtain all the non-default parameters in the alert.log file since this is displayed following each instance start and build your pfile from those settings.

Thursday, June 12, 2008

Installing and Configuring Enterprise Manager Client Interface (emcli)

Notes:
  • Enteprise Manager Client Interface (emcli) needs to be installed on each host from which its usage is required.
  • Environment was EM Grid Control 10.2.0.5

Installation
  1. Obtain the EM CLI Client kit (emclikit.jar). The emclikit.jar file is physically located in the $OMS_HOME/sysman/jlib directory of the 10.2 Grid Control OMS home, it can also be downloaded from http(s)://host:port/em/console/emcli/download
  2. Set your JAVA_HOME environment variable and ensure that it is part of your PATH. You must be running Java 1.4.1 or greater.
  3. Install the EM CLI Client. You can install the client in any directory either on the same machine as the EM CLI Management Services or on any machine in your network (download the emclikit.jar to that machine). Run the followingcommand:
java -jar emclikit.jar client -install_dir=

Setup
1. Tell emcli how to find em repository with the following command
$> emcli setup -url=http://:4889/em -username=sysman

emcli will ask you for your password.

2. Tell emcli how find your sudo program (all on 1 line)
$> emcli create_privilege_delegation_setting -setting_name=sudo_setting -setting_type=SUDO -settings="SETTINGS:/usr/local/bin/sudo –S –u %RUNAS% %command%"


3. Apply this setting to your specific hosts (all on 1 line)
$> emcli apply_privilege_delegation_setting -setting_name=sudo_setting -target_type=host -target_names="host1;host2;host3;"

Thursday, March 15, 2007

Setting Credentials for the Job System to work with Enterprise Manager


Windows systems require that you set the correct credentials for the Jobs system to work properly in Enterprise Manager. By default, the Management Agent service is installed as a LocalSystem user. When submitting jobs, such as stopping or starting the database, the user submitting the job must have the Log on as a batch job privilege enabled.


Perform the following steps to establish that privilege for any
operating system user who needs to submit an Enterprise Manager job.


  1. Start the Local Security Policy tool:
    • Windows 2000: From the Start menu, select Control Panel, Administrative Tools, then Local Security Policy.
    • Windows 2003: From the Start menu, select Administrative Tools, then Local Security Policy.
    • Windows XP: From the Start menu, select Control Panel, Administrative Tools, then Local Security Policy.

  2. Under the Security Settings list, expand the list to Local Policies.
  3. Under Local Policies, double-click User Rights Assignment.
  4. Under Policy, search for the Log on as a batch job policy.

    If the Management Agent service is installed as any other user (that is, not LocalSystem), then, in addition to granting the Log on as a batch job privilege, you must grant the "Windows service" user the following three privileges:


    • Act as part of the operating system
    • Adjust memory quotas for a process (This setting is named Increase memory quotas

      on Windows 2000.)

    • Replace a process level token

  5. With each policy, perform the following steps:
    1. Double-click the policy name.
    2. In the Properties dialog box, click Add User or Group.
    3. In the Select Users or Groups dialog box, enter the name of the user (for example, jsmith, administrator, and so on.)
    4. Click Check Names to check that you have entered the name correctly.
    5. Click OK.

  6. Click OK to exit the Properties dialog box, then exit Local Security Settings and Administrative Tools.
  7. Restart your computer.

If a user exists locally and at the domain level, Windows gives the
local user precedence. To use the domain user, qualify the user name
with the domain name. For example, to use the user joe in the ACCOUNTS domain specify the user name as ACCOUNTS\joe.

Note: Validated for EM Grid Control 10.2.0.4 - 10.2.0.5

powered by performancing firefox

Tuesday, June 13, 2006

To establish user equivalence (SSH) between two servers

To establish user equivalence:

1. Create the directories for SSH:

mkdir ~/.ssh
chmod 700 ~/.ssh


2. Generate the user's public and private keys as the oracle user on all nodes in turn. Do not enter a passphrase when prompted, just press 'ENTER' 3 times to accept all defaults.

ssh-keygen -t dsa
ssh-keygen -t rsa


3. Create the authorized_keys file using both public keys for all nodes, copy the file to all nodes, and change the permissions (do this from one node only).

ssh salmon1 cat ~/.ssh/*.pub >> ~/.ssh/authorized_keys
ssh salmon2 cat
~/.ssh/*.pub >> ~/.ssh/authorized_keys
scp ~/.ssh/authorized_keys salmon1:.ssh/authorized_keys
scp ~/.ssh/authorized_keys salmon2:.ssh/authorized_keys
ssh salmon1 'chmod 600 ~/.ssh/authorized_keys'
ssh salmon2 'chmod 600 ~/.ssh/authorized_keys'


4. Visit each node in turn from every node (including itself). This ensure all nodes are added to each node's known_hosts file, and cluster operations can be run from any node in the cluster. This also serves to test the setup to ensure it is working.

[oracle@salmon1]$ ssh salmon1 'hostname ; date'
[oracle@salmon1]$ ssh salmon2 'hostname ; date'
[oracle@salmon2]$ ssh salmon1 'hostname ; date'
[oracle@salmon2]$ ssh salmon2 'hostname ; date'

Each of the above should return the date without prompting for a password.

Patching Oracle (9.2.0.6) to enable asynchronous I/O support w/RHEL

Patch Installation Instructions:
# --------------------------------
# To apply the patch, unzip the PSE container file:
#
# % unzip p3208258_9206_LINUX.zip
#
# Set your current directory to the directory where the patch
# is located:
#
# % cd 3208258
#
# Ensure that the directory containing the opatch script appears in
# your $PATH; then enter the following command:
#
# % opatch apply
#
# Patch Special Instructions:
# ---------------------------
# This patch is required to Enable asynchronous I/O support with Oracle running
# on RHEL 3. It should be applied only to 9.2.0.6.
#
# Instances under the ORACLE_HOME being patched do not need shutting
# down while opatch is run. opatch just copies libaio.so to locations in
# $ORACLE_HOME/lib/stubs.
#
# Once opatch has finished the following steps need to be completed. This
# does involve shutting down the Instances. Follow the steps below.
#
# 1. Ensure all instances in the ORACLE_HOME being patched are cleanly
# shutdown
#
# 2. cd to $ORACLE_HOME/rdbms/lib
#
# 3. Relink Oracle with asynchronous I/O enabled:
#
# % make -f ins_rdbms.mk async_on
#
# 4. Set the following init.ora parameters:
#
# set 'disk_asynch_io=true' # for raw devices and filesystem files
# set 'filesystemio_options=asynch' # for filesystem files
#
# 5. Restart All instances.

TRUNCATE privileges in Oracle

For future reference: The DROP ANY TABLE priv is required for the TRUNCATE option.

Error relinking Oracle RDBMS on Linux for Asynch IO support

Applies to:
Oracle Server - Enterprise Edition - Version: 9.2.0.4 to 9.2.0.7
Linux x86
Red Hat Advanced Server
Symptoms

While installing the 9.2.0.7.0 patchset on the linux x86 RedHat Server following error were encountered during the relink phase.

$ORACLE_HOME/install/make.log
------------------------------------------

/usr/lib/gcc/i386-redhat-linux/3.4.3/libgcc_s.so: undefined reference to `dl_iterate_phdr@GLIBC_2.2.4'
collect2: ld returned 1 exit status
make: *** [trcroute] Error 1

On checking
Note 303859.1 Requirements for Installing Oracle 9iR2 on RHEL 4
We find all the required packages has been already installed.

[root@incq038ad ~]# rpm -qa compat-oracle-rhel4
compat-oracle-rhel4-1.0-5

Cause

The problem is caused because System Administrator has installed the latest O/S updates from the RedHat.
And the Oracle patch "compat-oracle-rhel4-1.0-5" has been overwritten.

[root@incq038ad ~]# ls -l /usr/bin/gcc*
-rwxr-xr-x 2 root root 93120 May 17 01:36 /usr/bin/gcc
-rwxr-xr-x 2 root root 86364 Dec 1 2004 /usr/bin/gcc32
-rwxr-xr-x 1 root root 94784 May 17 01:36 /usr/bin/gcc.orig

[root@incq038ad ~]# rpm -qs compat-oracle-rhel4
normal /usr/bin/g++.tmp_1
normal /usr/bin/gcc.tmp_1
Solution

Please redownload the Patch 4198954 from Oracle Metalink.
And follow the instruction from the README to reapply the patch.

This time when you will reapply the patch you will receive the following error.

[root@incq035ad 4198954]# rpm -Uvh compat-oracle-rhel4-1.0-5.i386.rpm
Preparing... ########################################### [100%]
package compat-oracle-rhel4-1.0-5 is already installed

Please use the following command to reapply the patch.

[root@incq035ad 4198954]# rpm -Uvh --force compat-oracle-rhel4-1.0-5.i386.rpm
Preparing... ########################################### [100%]
1:compat-oracle-rhel4 ########################################### [100%]

[root@incq035ad bin]# ls -l /usr/bin/gcc*
-rwxr-xr-x 1 root root 914 Feb 23 2005 /usr/bin/gcc
-rwxr-xr-x 2 root root 84780 Dec 1 2004 /usr/bin/gcc32
-rwxr-xr-x 1 root root 93120 Sep 26 10:28 /usr/bin/gcc.orig

References
Note 303859.1 - Requirements for Installing Oracle 9iR2 on RHEL 4